Showing posts with label Home Decor. Show all posts
December 23, 2010

Fun Fireplace Flare!

Talk about a random project---this is exactly what happens to us in the winter! We are cooped up inside the house while it is freezing outside, not to mention it gets dark SO early now, so what do we do...head over to Home Depot or Lowes (of course) and see what we can get our hands on!

This time in particular Home Depot was having a GREAT sale on the mosaic tiles that come in 12" x 12" sheets--they were half off! Now, before we get carried away and start buying the whole lot of these to do our kitchen (something we have REALLY wanted to do), we decided to test our tiling skills on our fireplace first....

Success! Basically, $20.00 later and starting/completing a project from 8pm-10pm on a work night--voila! Seriously, this was such a simple project and so worth it! It adds a splash of color and definition to the all black fireplace, tying in the colors of the room nicely! Definitely recommend! We will for sure be doing this to our kitchen at some point!

Fireplace Before (2008)


Fireplace After (2010)
December 9, 2010

Personalized Wall Art

I told you the next few posts would be consumed by baby projects! This just opens a door to a ton of new creations to make!

I love the look of having the child's name displayed in the room somewhere so decided to make my own. Taking a TV cubbie door that we saved from when purchasing our house (see here), I personalized this and painted it with her name: Kaydence (we call her KD for short). This is a SUPER heavy piece, so it will only be going behind the changing table, not crib.


December 2, 2010

Personalized Sign

Every girl needs a sign on their door right? Well, baby KD does! :)

This was a quick project--I just took a huge wooden letter 'K' and mod podged some pretty scrapbook paper on it. I then added to the look by adding spray painted wooden letters of her name (hot glued them) and decorated it more with paper flowers. Finally, I attached a ribbon for hanging!

Simple. Fun. Cute!
November 18, 2010

Baby Murals

Now that the room is painted and the beadboard is up, now it's time to start accessorizing--my favorite! Since I'm playing up the stripes/polka dot shapes, we added 3 white Japanese lanterns in one corner (mimicking dots). We then added a corner shelf we already had and placed a few items accented in pink.

Lanterns and Shelf

To personalize the room more, I pulled out the craft paints and got to work on creating some adorable wall art! To go behind the crib I painted 3 little murals--again tying in the pink accents and polka dots.

Painted Canvases

Canvas and Crib

The blank canvases came in a 2 pack and were 50% off, AND are very light, all pluses, and I was sure to use a non-toxic, acrylic paint with a ton of ventilation and a fan in the room while paining.
November 11, 2010

Beadboard and Stripes!

If you haven't realized yet...I LOVE decorating and even more so when I'm able to personalize things and make them my own creation! As I mentioned in previous posts, JD and I are expecting our first child February 2, 2011! It has been confirmed--a little girl is on our way and we couldn't be happier!

So, with a baby on the way it means my mind is constantly consumed by baby ideas and projects. First project to tackle--the nursery!

Even though we are having a little girl, my favorite color combo (as if you can't tell from my blog) is light blue and brown. I was bound and determined to have a nontraditional girl's nursery and not saturate the nursery in pinks, but still have enough pink to compliment the girliness of it--this would be through the use of pink accents in the room. I also knew I wanted a more modern nursery, playing up stripes and polka dots, but a space that is still welcoming and calming.

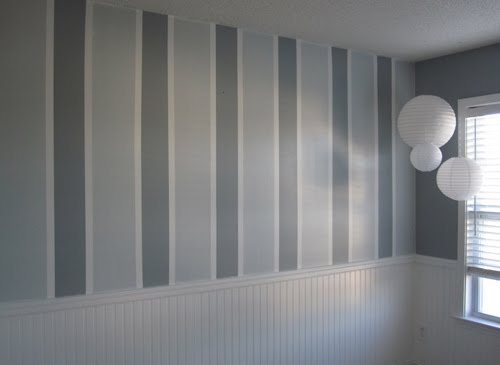
This being the case, we kept our bluish gray walls and on one accent wall added some stripes. To tone down the cool color, we warmed it up by placing white beadboard up (another first for us!). Love the look of the white beadboard, it really says 'nursery' to me!

Applying Beadboard

Applying Chair Rail

Painting Stripes


Completed Beadboard and Stripes
Now it's time to accessorize and personalize...More to come!
February 10, 2010

Plexiglass Art

There is this hibachi restaurant in town that my husband and I absolutely love! It is a cute little restaurant that serves some amazing hibachi food at half the price/time of the places like Yamatos and Miyabis. We went a couple weeks ago to a new one that opened up closer to where we live and I just fell in love with the way it was decorated! It had such a cool, modern vibe. The wall art in particular caught my attention, and while waiting for the food to be delivered my husband and I studied it and imagined ways we could easily and inexpensively replicate the art. I took a picture of our inspiration with my phone (below).

(hibachi restaurant art: inspiration)
After enjoying our food, we decided to head over to Lowes and see about replicating this. We decided the easiest way to recreate this for our home was to get some plexiglass, fun paper patterns and spacers. We ended up getting 2 huge sheets of plexiglass and had Lowes cut the glass for free at varying lengths. We had a total of 5 different lengths cut, and cut 2 of each length. We then bought some spacers and long screws to help with mounting the pieces and allow varying depths.

Once we had the materials purchased (for less than $20 I might add!), we then began building it, which was surprisingly easy. After laying out the paper patterns we wanted to use, we just sandwiched those between 2 matching sizes of plexiglass. We then drilled a hole in the plexiglass and slowly mounted to the wall. When mounting, we used the spacers to help create depth. The first piece we placed on the wall was screwed directly into the wall. The next piece used a small spacer to make it stand out more. We then started overlapping the pieces and created different depths with the spacers.
(plexiglass and paper laid out)
(drilling holes for mounting art)
(final presentation in hallway)
The good thing about this artwork is when we get bored with the paper patterns we selected, we can easily change it out! I did have to overlap some of my paper because the piece were shorter than the plexiglass, so I would recommend either getting larger paper or smaller plexiglass because at certain angles you can see the seam. Other than that, it was a simple, inexpensive and fun project! Definitely great for filling some blank wall space in the house!

Linking To:


January 18, 2010

Faith in the New Year!

So, I have slumped into the dreaded blogging taboo of disappearing! And I didn't just disappear for a day, or a week, I was M.I.A. for a few months! For those viewers I still have, thank you for sticking with me. Like many, it has been a "tough economy" and I hate to even mutter those words as if it is any excuse for my neglect to my blog, but it seems to sum everything up perfectly. I do however, feel I have legit reasons for being out of the blogging world for awhile. First my camera broke...I mean what is a creative blog without pictures?! Anyone who knows me knows how much I value pictures, so the loss of my camera hit hard. Then my Mac died (gasp!) and while I can blog on my husband's PC (doing now because I gave in), it just felt like I was cheating. Rest assured I am getting back into commission and LUCKILY it is a new year. 2010 is definitely a new year of greater and brighter things to come. I have faith in this upcoming new year. Faith things will happen as they should. Faith the pieces will fall into place appropriately.

Believe it or not, this artwork piece has taken on many looks before I completed it with full satisfaction. I don't have any pictures of the original state this project started in (again, sans camera), but when given to me, it was a simple frame with a white canvas in the middle. I think it use to hold a horizontal picture (the hanging wires were backwards than how I used them) that got ripped out or something, but needless to say, I had high hopes for this piece.

The first transformation this frame held was something simple, and since I have no pictures, obviously didn't appeal to my liking at the time. I turned it horizontal and painted the definition of 'family' on it. It was OK, but just not what I was going for so I scrapped that and started over.

I then turned it vertical and decided that I would fill the blank space with some sort of wrapping paper or design and hang it in our guest room. Satisfied with this idea, I went searching for some cool paper. Sometime in early December I came across this little botique with some awesome handmade paper. The texture was amazing and the pattern matched perfectly with the blacks, golden/tan colors I have in the guest room. Without hesitation I purchased the sheet of paper and rushed back home to place it in.

Unfortunately (but really fortunate in hindsight), the paper was too short and left a huge white gap at the bottom. To solve this a piece of scrap metal was placed in that spot, which also matched the colors in the paper and room so worked out perfectly. Unfortunately (again) the metal was a tad too narrow. To correct this, I had my husband cut and place a tiny block of wood to the far right and to cover the seams of the paper and metal meeting, we placed a small shelf.

Now, I just had to decide how to make that random block to the right and the metal blend with the design. It then came to me...I would continue with the Asian/Zen inspired piece by painting a character of some word in the metal and the english word in the block. But what word? I tossed out a ton of words...Hope, Grace, Destiny...etc. When I came to the word 'Faith' I sat and thought about that simple word in its entirety... FAITH. How perfect! Much like this project, where all the pieces fell into place perfectly, life is just like that. You have to have 'faith' that life will fall into place perfectly and as it is suppose to. The pieces of life will become seamless in time. Much like the pieces of this project, some pieces may stand out on their own and not seem to fit, but each will soon blend once the other pieces line up as planned. It isn't until the project is completed, or the story is told that you see the greater, bigger picture of things.

"Now faith is being sure of what we hope for and certain of what we do not see." Hebrews 11:1
October 8, 2009

B o o-tiful pumpkins!

I saw this idea last year when looking at HGTV's Fall decor postings, and I just couldn't pass it up this year...I HAD to make these! I mean who doesn't want some adorable, plastic-but-look-so-real pumpkins with the letters 'B', 'O', 'O' carefully cut out?! HGTV showed them being placed outside, however, with the crazy wind we have here because of the beach, I was afraid they would blow away...or some wild animal would walk away with my work of art in its mouth---so they are my inside decorations for now!

These were fairly simple to make and pretty cheap (would have been cheaper if I just waited until after Halloween for the sales like I kept telling myself...but I couldn't resist!). I bought these medium sized plastic pumpkins at Michael's. They were on sale for $5.99 each, but I also had the lovely 50% off coupon, so not bad at all!

I came home and picked the font on the computer. I chose one of my favorite fonts, 'Monterey'. Now, I know you can print out the font and trace it, but I just eye-balled it and drew on the pumpkins with a pen. Two HUGE things to keep in mind (that I didn't even think of until cutting) is to make sure you make the letters have enough support and that you make sure you draw the letters in a way that you aren't cutting out the centers of the B and O's...if that makes sense. You can see one of my O's has support at the bottom of the letter instead of it being 1 piece like the other O...I learned my lesson.

Cutting is the trickiest part. I started by cutting a hole in the bottom of the pumpkin for the lights to go in. I then took the small knife and started cutting. I tried all sorts of methods and I can't tell you which is the best...I did the sawing method, the puncture method and I then even resorted to scissors--all were challenging. I do have to say I feel it was pretty similar to cutting a pumpkin though--you have the harder outside and the foamy/squishy inside, so very similar.

I then placed these on top of our hutch with some rope light weaving in and out of it. I know you can also get those fake tealights if you wanted to set them outside. I am REALLY happy with how they came out and thrilled beyond words I get to use them next year!

Oh, and these pictures do not do these cute pumpkins justice at all! They are much cuter in person.

September 30, 2009

wall art

Finally! I have my camera back now, so I can start taking pictures of the projects I have been doing! The minute I saw this post from Thrifty Decor Chic, I had to go out and put this idea to work myself. I think it turned out fabulous! Now, I know she used 9 boards, but the wall I was wanting to place this on was to narrow, so I kept it simple with the 6 boards. Thrifty Decor Chic outlines the steps to making this (and includes more pictures), but I also have them listed below if you are eager to get started! I have also listed 2 small things I would change to make it easier if I were to do this again in the future.


  • Pick out your 12 x 12 inch scrapbook paper pattern. I went the cheapo route and just picked colors/patterns that I liked and that were on sale! (mine were 0.42 cents a piece!)
  • Go to Lowes or Home Depot and have them cut MDF Particle Board (Medium Grade) into 12 x 12 inch squares (board cost $7.42 for me, cuts were free). Keep in mind size does matter here! My guy cut 3 of my boards 1/4 of an inch too long and since the paper is a set size, I do have a slight boarder going on.
  • Paint or Spray paint the trim of the boards. I did mine in black to match the gray room they were being placed in better.
  • Taking spray mount, spray the paper and boards and adhere the two.
  • Now, you can either place picture brackets on the back of the boards, or nail through to hang them. Since I may move these in the future, I went ahead and placed picture brackets on the back of each one ($3.50 for 6).

Don't they just look fabulous! And they fill the space so well! The thing I love best about these (besides the really inexpensive cost) is that when I get bored with these patterns, I'm just going to spray mount new scrapbook pieces! Love it!

Now, two things I would do differently if I were to do this again:
  • Have them cut 11 x 11 boards, so the 12 x 12 paper overhangs and you take an etching knife to trim the excess. That way the paper is flush to the edges and you don't have to worry about lining it up 100% perfectly.
  • Paint the trim...I spray painted it this time and I personally think I am just not a good spray painter...I made the biggest mess! Again, probably just me.
In any case, this project was super fun, super easy and super cheap! If you have a blank wall and some time, give this a shot and let me know! I'd love to see what patterns you picked out!
August 27, 2009

Bored with your headboard?

OK...so I guess I wasn't bored with my headboard because my guest room doesn't actually have a headboard...but I was bored with staring at a blank wall behind the bed where the headboard should be. The guest room needed something more, but I wasn't about to go and buy a bed frame and headboard--and I also didn't have the funds for some huge inspiring art piece. Instead, I scavenged around the house looking for anything I could reuse to fill that blank space.

While digging through boxes of things and pondering what to do, I came across the small 6" x 6" mirrors used as center pieces for my wedding. I had a ton of these and they were begging to be reused! Taking a handful of these mirrors, I walked in the guest room and stared at the blank wall for what seemed like hours...we were definitely having a stare down and the blank wall was winning...

Finally, it came to me! I was going to create a contemporary geometric pattern above the bed, where normally a headboard would go. I had decided to create 8" x 8" black squares and place the mirror circles in the middle, and hang on the wall. This could act as a piece of artwork and fill the space temporarily until I had an actual headboard.

I really should have waited for small 8" x 8" wood pieces to be cut, but I had an idea and like normal, I wanted it done right then and there...so I made do with what I had. Grabbing extra cardboard boxes, I started vigorously cutting the 12 8" x 8" squares. I then grabbed my paintbrushes and black paint and got to work. JD, of course walked in the living room to see this huge mess I had created and could only laugh and let me continue my crazy work.

Once the paint dried, I attached the mirrors in the center and hung (as straight as possible) each of these pieces. Finally, the room was coming together and life was being brought into the room! The best thing about this project is it cost absolutely nothing but my time. Surprisingly, I do get a lot of complements on the pieces and my guests never realize it is cardboard until I point it out! Amazing what the eyes see...but even more amazing what you items you can reuse in your house!
August 24, 2009

Craft Closet

Among many things, I'm notorious for being organized...so much so that people laugh when I show them my 'junk drawer' in the kitchen (a post for another day I suppose). Being organized may seem like wasted time or energy to others, but I actually like cleaning and organizing! It is a great stress relief!

Since we moved into our house about a year ago, I have been itching to convert one of our FROG (yes, we have big hopes for this FROG of ours!) closets into a craft closet, organizing all my craft stuff in one central location. Grabbing the paint we used to color the room, I moved all the stored boxes out of one of the closets, painted and decided I was tackling this project that moment! JD helped me with the shelves, ribbon holder and painting, so I had great help! Within 2 days we were able to knock this out!
As you can see, I have labeled baskets storing crafting tools, utensils, paint, paper..etc. I also used a trash can to hold my wrapping paper and a curtain rod for the ribbon spools. Finally, a larger basket was used to store my saved up tissue paper and gift bags. If you have a vacant closet and a good bit of craft clutter, I highly recommend this! When the closet doors are shut, my crafting clutter is out of sight--but when the doors are open, I'm ready to dive in and play!
August 20, 2009

Clean, Reusable Calendar

What do you get when you take an old college dry-erase board calendar and combine it with an old large collage frame? Well, see for yourself...
You get a very clean, reusable calendar, perfect for any office setting!

After moving to the beach and unpacking my old boxes, I came across my dry-erase calendar board and my old college collage board. Instead of updating ALL the pictures in the collage, I decided to use this collage and frame to create a nicer looking dry-erase calendar that matched the look and feel of the office better. I simply took apart the old dry-erase calendar, just taking the thin calendar portion (if you have one similar to me, it is just a vinyl calendar piece laid on top of a card board piece, framed with a cheap plastic). Next, take out the photos from the collage, leaving only a few openings to be next to your calendar. Now you can just place and secure the calendar on top of the collage matting. Finally, take your dry-erase pen and secure it to the outside of the frame with some Velcro adhesive. Voila! You now have a more aesthetically pleasing calendar for your office! The dry-erase marker should be able to be erased on both plastic and glass. I usually clean my calendar monthly with some nail polish remover...works like a charm!

Remember, most 'junk' can be turned into something amazing! Just clear your mind a bit, dust off the old cobwebs on your 'junk' and put it to good use!
August 18, 2009

Upholster Your Furniture

I have a big project in the FROG I want to eventually undertake. Basically, it requires me to convert our old TV stand into a sitting bench with cushion. Now, since I have never upholstered anything before, I needed a test dummy...bar stools it is!

I have had these bar stools in my life since as long as I can remember. They have followed me from childhood, to college, to present--so it was time for an updated look anyway! Since most of the furniture in our house is espresso or contemporary black, I decided it'd be easiest to paint black and upholster the top. After purchasing some clearance fabric and foam at JoAnns, and grabbing my husband's staple gun--I got to work (and had WAY too much fun with the staple gun I might add!) All in all, I'm actually quite pleased with the result and once I get started on the bench I'll be sure to share that as well! Enjoy!
August 17, 2009

Custom Shot Glass Case

Everyone has that one thing they collect, well, mine for years has been shot glasses! It never ceases to amaze me at how many people still remember that, too, but I'm glad they do! I remember when I first started collecting them, I ordered a custom case but it only held 25 shot glasses. Well, at the time 25 seemed like a lot, but it wasn't long until I quickly outgrew that case.

When packing up and moving to the beach, all my precious shot glasses were wrapped tightly and placed in a box. It wasn't until we moved into our house that I rediscovered this treasure of mine and was determined to find the appropriate home for them! I was on a mission and that meant a project was brewing...

After researching various cases and again being stunned at the costs for them, my husband and I set out to design and create our own custom shot glass case that matched our modern decor style. After drawing up the plans and buying the wood, we created the case, shown to the left.

It can hold well more than the shot glasses I have, which is perfect...room to grow! We didn't make individual slots for the shot glasses, because I wanted to be able to fill the space with picture frames and other knick-knacks until I got more shot glasses. We also made the bottom and top rows taller to hold the double shot glasses. It was a blast working on this project with JD. While he did the wood work, I was in charge of painting and organizing the shot glasses. This is one of my favorite projects we have done to date because the end result was so rewarding. I now can go in the FROG and see our shot glasses being displayed proudly. I can look at each shot glass and still remember who gave me them and for what reason, so this is very special to me. Another great thing about this case was it cost...are you ready...$16.00! That is right, $16.00 for materials and then the only other cost was our time! Well worth it in my mind! Enjoy!
Related Posts with Thumbnails