Showing posts with label Home Before and After. Show all posts
December 23, 2010

Fun Fireplace Flare!

Talk about a random project---this is exactly what happens to us in the winter! We are cooped up inside the house while it is freezing outside, not to mention it gets dark SO early now, so what do we do...head over to Home Depot or Lowes (of course) and see what we can get our hands on!

This time in particular Home Depot was having a GREAT sale on the mosaic tiles that come in 12" x 12" sheets--they were half off! Now, before we get carried away and start buying the whole lot of these to do our kitchen (something we have REALLY wanted to do), we decided to test our tiling skills on our fireplace first....

Success! Basically, $20.00 later and starting/completing a project from 8pm-10pm on a work night--voila! Seriously, this was such a simple project and so worth it! It adds a splash of color and definition to the all black fireplace, tying in the colors of the room nicely! Definitely recommend! We will for sure be doing this to our kitchen at some point!

Fireplace Before (2008)


Fireplace After (2010)
December 9, 2010

Personalized Wall Art

I told you the next few posts would be consumed by baby projects! This just opens a door to a ton of new creations to make!

I love the look of having the child's name displayed in the room somewhere so decided to make my own. Taking a TV cubbie door that we saved from when purchasing our house (see here), I personalized this and painted it with her name: Kaydence (we call her KD for short). This is a SUPER heavy piece, so it will only be going behind the changing table, not crib.


December 2, 2010

Personalized Sign

Every girl needs a sign on their door right? Well, baby KD does! :)

This was a quick project--I just took a huge wooden letter 'K' and mod podged some pretty scrapbook paper on it. I then added to the look by adding spray painted wooden letters of her name (hot glued them) and decorated it more with paper flowers. Finally, I attached a ribbon for hanging!

Simple. Fun. Cute!
November 18, 2010

Baby Murals

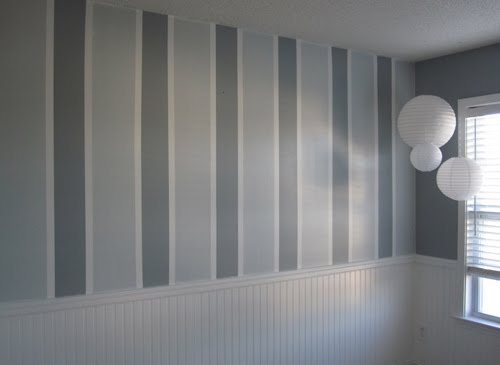
Now that the room is painted and the beadboard is up, now it's time to start accessorizing--my favorite! Since I'm playing up the stripes/polka dot shapes, we added 3 white Japanese lanterns in one corner (mimicking dots). We then added a corner shelf we already had and placed a few items accented in pink.

Lanterns and Shelf

To personalize the room more, I pulled out the craft paints and got to work on creating some adorable wall art! To go behind the crib I painted 3 little murals--again tying in the pink accents and polka dots.

Painted Canvases

Canvas and Crib

The blank canvases came in a 2 pack and were 50% off, AND are very light, all pluses, and I was sure to use a non-toxic, acrylic paint with a ton of ventilation and a fan in the room while paining.
November 11, 2010

Beadboard and Stripes!

If you haven't realized yet...I LOVE decorating and even more so when I'm able to personalize things and make them my own creation! As I mentioned in previous posts, JD and I are expecting our first child February 2, 2011! It has been confirmed--a little girl is on our way and we couldn't be happier!

So, with a baby on the way it means my mind is constantly consumed by baby ideas and projects. First project to tackle--the nursery!

Even though we are having a little girl, my favorite color combo (as if you can't tell from my blog) is light blue and brown. I was bound and determined to have a nontraditional girl's nursery and not saturate the nursery in pinks, but still have enough pink to compliment the girliness of it--this would be through the use of pink accents in the room. I also knew I wanted a more modern nursery, playing up stripes and polka dots, but a space that is still welcoming and calming.

This being the case, we kept our bluish gray walls and on one accent wall added some stripes. To tone down the cool color, we warmed it up by placing white beadboard up (another first for us!). Love the look of the white beadboard, it really says 'nursery' to me!

Applying Beadboard

Applying Chair Rail

Painting Stripes


Completed Beadboard and Stripes
Now it's time to accessorize and personalize...More to come!
November 4, 2010

::ribbit:: FROG is DONE!

Since the day we stepped foot into the FROG while touring our house, we decided if this was to be our house we would use this huge, 2 car garage sized finished room to be our Family room...And just to put a plan in action, after we purchased the house and moved in, we drew up plans and taped off our ideas for what we envisioned to be our custom built cabinet and bookshelf space.

FROG 2008
Well, I'm SO SO proud to say, that TWO years later, we have put this plan into motion! Since we had everything drawn up and priced out years ago, it was just a matter of finding the time to pull it together! All I have to say is WOW! For a little over $500, we were able to put this plan into action!

We started by hard wiring the internet wires and cable we knew we would need to have there. We then created a base for the cabinets to be placed on. This was probably the most time consuming part of the project because here we learned about the importance of accurate measuring and keeping things level. Since we were going wall to wall, we also learned that the corners in our house are NOT perfect 90 degree angles, so you have to accommodate for that.

Base work
The next part was fun...placing the cabinets on our base we created! That really helped illustrate our vision! When then worked on the counter top, ceiling board (our ceiling has the annoying popcorn, so we covered it for this built-in), shelves, and finishings (molding).

Placing Cabinets

Prepping Shelves

Prepping Shelves

Eventually, after a ton of caulk, liquid nails, screws, nails, kiltz, white paint, wood and saw dust in the room, and hammered thumbs, our FROG came to life and is even better than we imagined!

Completed Built-ins!Some shelf decorations
Now we have all this storage space, and just in time, too (because everything has to be moved out of our computer room to this room for the nursery)! We will eventually put a TV up here and this will be our new family and gathering room!
October 27, 2010

DIY Shuffleboard Table

Yes, we are probably in a small percentage of people to claim we have a personal shuffleboard table, and even a smaller percentage to claim it is combined with our garage cabinets!

At first glance, a work bench/cabinet
Why shuffleboard? When JD and I were in college, and more so when I would visit him while he finished (I graduated 2 years before him), we LOVED going to the Clemson bars and playing the free shuffleboard games! It quickly turned into betting terms---winner gets Brewster's Desserts, winner gets free dinner...etc. Can't complain (when you win!).

To bring home a piece of our past (and provide great entertainment for guests), JD built his cabinet/work bench that opens up to a regulation size shuffleboard table! After thorough research on how to create a shuffleboard table, we went with the economic option and got hard wood planks from Habitat for Humanity and made this the shuffleboard deck. Then with spare metal, created a system so you can continually level out these planks in the future through the use of screws. Finally, for an added embellishment and personalized look, we took a wood burner and etched a Clemson paw in the center of the table---always reminding us of the history of shuffleboard to us. To top it all off, we created a stellar smooth surface by using a VERY thick epoxy glaze coating (this was quite the adventure in applying and definitely took two of us!).

Take a closer look...
A shuffleboard table!
Wood burned Clemson paw in the table center
Looking down the table
Now, our games and bets continue and the shuffleboard table is quite the conversation starter! To keep track of our winnings we even mark on the table the final score and betting terms!
October 21, 2010

Garage Fit for a King!

A garage is the man's layer right? Well trust me, my husband jumped on the opportunity to make his space the perfect getaway complete with all things MAN: TV, Tunes, Dart board, Tools, Sports Equipment and Outdoor Gear. And he didn't just organize his garage, he made it a place that I actually enjoy sitting in and hanging out! Forget the tool gas fumes, this garage is where it's at!

When we first moved into our house 2 years ago, nothing was finished in the garage. After I got a good grounding on some of the house projects, JD jumped in and started to focus on his beloved garage....again a project that consisted of a lot of learning and firsts (that is what first homes are for right?!).

Garage 2008
He started with insulation and putting up drywall in the garage. Wow, what a difference that makes!

Drywall Up

He then purchased a kit (on sale, of course!) for finishing the garage floor. This is my favorite part--I think EVERY garage should have floors like this! I can actually walk barefoot and not worry about black bottomed feet!

Then it was time to organize--this consisted of hanging shelves, arranging tools and building a cabinet to organize garage items and also provide a nice surface for projects. The cabinet/work area is such a great way to hide the garage clutter-but this cabinet doesn't just serve as a storage provider...it is also our personal, home made, regulation size... SHUFFLEBOARD TABLE (another post for this).

Shelves
Mural (for fun)
Work Bench/Cabinet Storage/Shuffleboard Table
With all these fun things in the garage---why even go inside?!
October 14, 2010

Hot Tub Time Machine

My husband and I are regular Craig's List shoppers! You can seriously find some GREAT deals--some things just need a little TLC and you just have to have patience with searching and finding the deals.

Our latest guilt-free Craig's List purchase is...a hot tub! Yes, I know, a hot tub?! This person was wanting to get rid of a perfectly working, 6 person tub...only requirements were we would have to remove it from his deck and the framework needed some finishing work on it, but all in all, great condition!

Well, if you know anything about a CL purchase-you have to act fast on the deals! This makes for a somewhat impulsive buy (because let's face it...a hot tub was NOT on our list of things we need at the moment or on our never ending project list), but again, we couldn't pass up the price so we shamelessly made the purchase!

This hot tub, bought in March 2010 has been an ongoing project and quite the learning experience---a lot of firsts on our end! First, we had to find a spot for the tub. This meant we had to transplant some plants (a first!) and pour a level concrete slab for the tub to sit on (another first!).

Transplanting

Preparing the Grounds
We then got 6 friends to help pull the tub out of the previous owner's deck and place in our designated tub spot. The following months consisted of redoing the side boards, wiring the hot tub to 2 breakers (a big FIRST!), learning about hot tub care and chemicals (another first) and ensuring it works correctly (luckily it does!!).

Transporting Hot Tub

Wiring

Refinishing
We are so happy this 6 month project is completed, and just in the nick of time for the upcoming Fall/Winter weather!! :)

Complete!

Only downfall, is I will have to wait until after February to enjoy the hot tub, because in the midst of this project we found out we are expecting our first!! A little girl--which means one thing...more projects in the mix!!
March 7, 2010

I heart color!

Anyone ever watch HGTV's color splash (or any home improvement show for that matter)? I love those shows, especially the before and afters! A lot of times I just DVR them and see the before at the beginning and fast forward to the end to view the afters! What an amazing transformation simply changing up the color can do for a home!

Well, this weekend was an 'off weekend' from traveling to see family and friends so my husband and I decided to tackle the daunting task of repainting our living room and hallways! We have lived in our house since 2008 and have always joked the paint color was 'starter home white'---you know what I'm talking about? It's the contractor white they put down to cover the dry wall? Anyway, with a free weekend upon us a change was needed--plus we had NO touch up paint for all the scratches and holes we have created in the 2 years here.

So knowing we were painting this weekend, during the week it was time to settle on colors. I had no idea how difficult that would be! I knew I wanted a tan and/or chocolate, but the choices were so overwhelming and all the colors looked so much better in the store than at home because of the different lighting and surroundings! By Friday we literally had 12 splotch samples on the living room walls as well as paint chips taped to the wall. I felt I was as picky as Goldilocks (but with paint): Some were too pink, some were too green...none quite right! Needless to say, by Saturday it was crunch time-time to pick and just roll with it! So we did...

And I LOVE the colors we chose! Our free weekend turned into 8 hours of painting labor requiring me and my husband to climb a 12 foot ladder placed on the stairs and use a 4 foot extender pole for painting the stairwell--WHEW! That was so interesting to say the least!

Below are the before and afters of what was done this weekend. I am happy to now cross this off my project list! Next project...crown molding and mosaic tile for the fireplace! Can't wait!

Hallway Before: 2008
Hallway After: 2010

Hallway Before: 2008
Hallway After: 2010

Living Room Before: 2008
(picture when touring
house before moving in)
Living Room Before: 2008/2009Living Room After: 2010Living Room After: 2010

Painting the stairwell: 2010
(what an adventure THAT was!)
Completed stairwell: 2010
(just to show you how
high that was!)

October 13, 2009

Before and After Home Improvement-Kitchen

WARNING: Picture overload. I apologize in advance!

A lot of my local friends have personally seen the transformation of our house slowly take place, but when I saw DIY Show Off post a Before and After Home Improvement party, I felt obligated to join and share some before/afters of our house. We bought our house in May of 2008 and I love every minute of personalizing it and making it 'our' place and our home, but I do feel the work is never done!

Before we even moved into this house the first thing we did was transform the kitchen and dining area. Now, don't get me wrong, the before wasn't bad (so if any one of you have this same color or style, I'm not judging, it just isn't us), but the space before felt a bit dark and drab. I seriously felt I was walking into a Duck Head commercial kitchen with the forest green and the wood cabinets...I felt any moment I was going to turn the corner and see a deer head hanging off the wall--that is just what the color palette felt like to me, personally (again, no offense to anyone with this color palette!).

I wanted natural light to shine in and a more soothing color for this space that people often congregate in--so we took action in creating a brighter, more open and inviting space:

Before: Kitchen

Before: Kitchen
Before: Dining

(not our furniture, previous owner's)

Before: Primed Dining

Before: Cabinet Doors Off
(prep for painting)
Before: Primed Kitchen
After roughly 2 weeks of working on this project, the following is exactly what we did, which wasn't much, but made a great transformation to our kitchen and dining. Again, amazing how paint makes a world of a difference!
  • Walls: taped, primed, painted
  • Cabinets: sanded, primed, painted, new hardware, accent lights above cabinet molding
Below are some after pictures. The kitchen/dining are still not completed, as I previously said, I feel my work is never done. When time and money permit I would love to put up a tile back splash and crown molding, and maybe redo our counter tops....ahhh to dream!

After: Kitchen

After: Kitchen
After: Cabinets

After: Dining

Related Posts with Thumbnails