
So, with a baby on the way it means my mind is constantly consumed by baby ideas and projects. First project to tackle--the nursery!
Even though we are having a little girl, my favorite color combo (as if you can't tell from my blog) is light blue and brown. I was bound and determined to have a nontraditional girl's nursery and not saturate the nursery in pinks, but still have enough pink to compliment the girliness of it--this would be through the use of pink accents in the room. I also knew I wanted a more modern nursery, playing up stripes and polka dots, but a space that is still welcoming and calming.
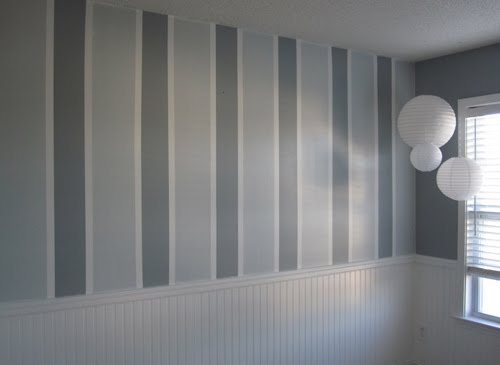
This being the case, we kept our bluish gray walls and on one accent wall added some stripes. To tone down the cool color, we warmed it up by placing white beadboard up (another first for us!). Love the look of the white beadboard, it really says 'nursery' to me!
Applying Beadboard

Applying Chair Rail

Painting Stripes

Completed Beadboard and Stripes
 Now it's time to accessorize and personalize...More to come!


5 comments:
The stripes make a huge difference. The room was nice before you painted the stripes, but they just make the whole room.... I'm actually thinking I need to do some DIY projects...
Thanks for sharing and Congratulations (early)on the baby and becoming a MOMMY!!!
Kelly
www.kellyjoskreations.com
I love this! We are doing the stripes in our nursery as well and I was wondering first of all, how did you get the white stripes in there? Was that a photo left out? Or am I just blind? Also, how wide are your stripes? They look perfect sized for what we want to do. Thanks so much!
Hey Krista! Thank you! Yes, I first painted the background (which was already done before starting the stripes). Then I marked for the middle colors (that is photo 2. Then after that, I marked again for the white stripes (I didn't take that photo). And after ALL that, you get photo 4. It is a lot of tape work, but really not too time consuming!
As far as how wide they are, the white stripes are the exact thickness of the thickest tape we could find. Then the middle I just tried to make even (so the pattern would be even) with the length of the wall--meaning I took the length and found 2 measurements perfect for our wall...I want to say they were around 6" and 9", but I don't recall off hand.
Best of luck with your stripes! Send me a photo, would love to see how it turns out! :)
Love how this room came out! I am planning our baby boy's room and have been through 10 different paint samples...not kidding. Do you happen to know what the Brand and Color of the original bluish gray paint you used? It is exactly what I've been looking for and would help me so much lol. Thanks!! :) ~ Noel
Thanks for the comment! I know it was called 'screendoor gray', but I can't remember the exact brand of the blueish/gray paint-probably Behr or Olympia are my 2 guesses. Hope that helps some and congrats!
Post a Comment
I appreciate you checking out my blog. I welcome any comments and ideas! Remember, these ideas I share are just a thought...a polka-dot thought! Thank you.